Quick View
Solmeta GeoTagger Pro 1
Revision 13 ~ 2015-01-13 at 20:15 UTC
2012 Innovative Design Award

Since this review, Solmeta began shipping the Pro 2 series which greatly
improves the Pro 1 with new electronics and LCD, USB access, and more.
We will publish a review of the Pro 2 when we get a test unit.
improves the Pro 1 with new electronics and LCD, USB access, and more.
We will publish a review of the Pro 2 when we get a test unit.
This Quick View is on the Pro 1 but may references some features
that Solmeta says have changed or been improved in the Pro 2.
that Solmeta says have changed or been improved in the Pro 2.
Solmeta's GeoTagger Pro 1 series was the top tier of the company's talented GPS units and it earned our Worthy Design Award. They also make the very affordable GeoTagger N3, N2, and N1 models (in order of decreasing price). The Pro 1 has been replaced with the much improved Pro 2.
The Pro series (1 & 2) can operate as small, featherweight, self-powered and rechargeable GPS data loggers that you can use on their own, attaching them to anywhere that allows a sky view - such as a helmet, handlebar, car dash, or shoulder strap. This use is great for exploring, hiking, field photography, etc. The most prominent feature of the Pro series is that it can also be directly wired into a growing number of Nikon models by attaching 1 of 3 model specific cables. The Pro 2 adds support for newer Canon EOS models.
When wired to the camera, the Pro series and their smaller N series brothers provide GPS data that the camera inserts it into the EXIF header area of each images they take. Using one of three different adapter cables, the Pro series should support the following Nikon models (as of Jan 2015) but always check with Solmeta before buying as camera models change and revisions are frequent:
- D810, D800/E, D4, D4S, D3, D2Xs, D2X, D2HS
- D700, D300, D200, D90, Df, D750, D610, D600
- D7100, D7000, D5300, D5200, D5100, D5000, D3300, D3200, D3100
- COOLPIX P7800 and P7700.
Example of LCD window's different display modes showing coordinates, altitude, speed, and date/time:
|
|
,+LCD,+Coordinates.jpg)
,+LCD,+Alt-Spd-Dat-Tim.jpg)
P OS I T I V E S
- Very small and very light so it can be mounted anywhere that is convenient.
- Can be mounted anywhere like a shoulder strap, handlebar, camera hot shoe,
- Provides coordinates, location, exact date/time, altitude, direction, pitch, and speed.
- Connects to compatible Nikon cameras with GPS info to embed in each image.
- Has its own internal rechargeable battery
- Runs off camera power when connected or its own battery when used alone.
- Multifunction LCD display and action buttons to show live GPS data and set options.
- Data Log mode stores up to 60,000 points (storing one every 1 second to 30 minutes).
- Supplies last location to camera when GPS signal lost - such as when moving indoors.
- As a data logger, can record locations to later stamp non-GPS image based on time.
- Company is very responsive to design suggestions and implemented fixes and improvements faster than most OEMs do. Some of my suggestions appeared in production units within 6 months.
- Although in China, they are responsive and replace defective hardware within a week.
They have since increased the number of distributors - some of whom are on Amazon.
N E G A T I V E S
- When mounted in a hot shoe, there is no lock making it easy to fall off camera.
- Needs to be treated like the delicate instrument it is. If so, you should have few problems!
- GPS 1st acquisition time a bit slow, taking 20-100 secs in the Northeastern US in 2011.
Subsequent acquisitions take 1 second to the maximum as the off time between readings increases. - The utility software is crude, tricky to use, but effective. It has also has been improving.
- The unit's user manual has improved a lot from initial releases but still needs some work.
- Location reading fluctuates quite a bit - but that is to be expected for such a small unit.
- Early versions had quality issues with the cables and firmware but Solmeta has been busy redesigning the cables and has upgraded the firmware.
All things considered, we rated the unit 8.0 out of 10 and gave it out Innovative Design Award. It packs a lot of features and modes into a very small and light unit that can be mounted anywhere. Having an LCD readout as well as being able to operate as an independent data logger --or-- a direct connect camera GPS makes it a very potent and flexible product. Its successor, the Pro 2 looks to be even more capable.
R A T I N G D E T A I L S
First, let me say that this score is very high for our quick reviews. None of the few camera GPS units I've worked with in their final release have earned 8.0 or more. We are paid to assure and provide quality in design and production. As such, we don't grade on bell curves but we do make allowances for the maximums that can be expected within the constraints of practicality.
Instead, we use an absolute scale based on several factors such as how well a product ...
| provides features needed by users | 9.0 / 10 (outstanding) |
| compares to how we would design it | 7.5 / 10 (we have high standards :-) |
| was it made, finished and packaged | 6.0 / 10 (based on old units, since improved) |
| works in the field | 8.0 / 10 (after several glitches were quickly fixed) |
| OEM serves their customers | 8.0 / 10 (excellent for the language difference & distance) |
The process of rating this type of GPS unit was challenging because there were initially fewer models of Nikon that had the data connector, firmware, and protocol to embed external GPS data into the EXIF header of images. Canon had a limited facility in its flagship cameras that uses its WFT-E2 wireless transmitter system which is capable but quite complex and costly.
[update] Much has changed in 2 years. Many of the newer more capable Nikons have a data connector for GPS. The the newer Pro 2 series also supports some Canon EOS models.[end]
If you own a handheld GPS unit like a Magellan that has the ancient but standard GPS serial interface and don't mind its weight and size, you might be considering using that with Nikon's special NMEA GPS serial cable adapter. However, it listed for $164 US in Jan 2015. You could get the Pro 2 for only $26 more or the very capable Solmeta N1 (without LCD or data logging) for $24 less. So, even if you are in love with your handheld GPS unit and you want to stamp your images, I suggest a Solmeta for about the same cost, thus giving you two GPS options with more flexibility!
[update] Since this Quick Take was published, subsequent updates to the Pro 1 fixed all the notable problems that we reported so it has earned our 8.5 rating. All of our reported problems of major significance were fixed rather quickly with new revision or models. Our compliments to their management and engineering staff for being attentive and taking bug reports to heart. [end]
D E T A I L S
 Solmeta, finalized the current generation of their flagship GPS unit for photographers and geo-taggers called the GeoTagger Pro 1.
The features that immediately set this unit apart are its internal
memory, internal power, on-board LCD and 3 different operating modes
that allow it to act as a:
Solmeta, finalized the current generation of their flagship GPS unit for photographers and geo-taggers called the GeoTagger Pro 1.
The features that immediately set this unit apart are its internal
memory, internal power, on-board LCD and 3 different operating modes
that allow it to act as a:- Standalone GPS with LCD for location
- Independent GPS with own power and memory
- Direct connect with Nikons to stamp images
We had had the opportunity to test several beta and released versions of Solmeta's GeoTagger Pro 1 camera-oriented GPS unit. We tested them with the Nikon D300 and D800 models.
The unit is designed to tightly interface with selected Nikon DLSR's having a data/control jack. Nikon was the first camera maker to provide such an interface. When connected to our D300's 10-pin jack via a special adapter cable (see photo), the camera reads the Pro's and stamps images with the coordinates of the location. The Nikon then stores that data in each image's EXIF data area, aka "metadata". The stock photo here shows a Pro 1 connected to a Nikon D90. The cable on a D300/D800 attaches on the front side of the camera near where the "D90" logo is in the stock photo above.
 |
| GeoTagger Pro 1 mounted on a Nikon D90 |
The unit is designed to tightly interface with selected Nikon DLSR's having a data/control jack. Nikon was the first camera maker to provide such an interface. When connected to our D300's 10-pin jack via a special adapter cable (see photo), the camera reads the Pro's and stamps images with the coordinates of the location. The Nikon then stores that data in each image's EXIF data area, aka "metadata". The stock photo here shows a Pro 1 connected to a Nikon D90. The cable on a D300/D800 attaches on the front side of the camera near where the "D90" logo is in the stock photo above.
W O R K I N G W I T H G P S D A T A
Not only did the Pro 1 provide the expected latitude and longitude coordinates, it also provided altitude, compass direction, and GPS date/time of the target scene. Although fields other than coordinates are not considered "standard" GPS data, our D300/D800 recognized and inserted them all into the image. However, depending on your image manager/viewer, only some of these data fields will be viewable.
Viewing GPS Data: While Shooting
Pro 1 LCD: While shooting, you can also use the Pro's LCD to directly view the current GPS data in real time. The display toggles between location, time, and its various options. Although the display is tiny as compared to the large mapping displays of handheld GPS units, it is adequate (though a bit tedious) for guiding you on a printed topographical map that shows latitude and longitude grid lines.
Nikon LCD: When connected to a supported Nikon, you view GPS Location and Altitude on the camera's main viewing LCD as you shoot. That data is then stamped into the captured image's EXIF data so, when reviewing shots recently taken and still in the camera's memory, the GPS data can be viewed on the camera's LCD along with all the other EXIF data such as the capture data/time, focal length, shutter speed, and countless other camera settings.
Viewing GPS Data: From Image Using Software
Once GPS data is stored in an image's EXIF metadata, the info stays with the image forever (unless removed while editing) and can be viewed at any later time using various image management programs.
ACDSee Pro: When viewing GPS encoded images imported from the camera, recent versions of this popular image viewer/manager/editor can show a lot of the EXIF data embedded in the images. Although earlier versions used to show more, they all show the basic location data. Moreover, ACDSee Pro will show the image locations on a map.
 |
| Data shown by ACDSee Pro |
Here's an example of a model's Z-Card promo image marked on a map based on GPS data. However, in this case, there was no GPS info in the image since it was a scan of a 1970's negative. So, I dragged the image to the known location on the map and ACDSee Pro embedded the GPS data from the map location. The result is the same. You see the image placed on the map where it was shot.
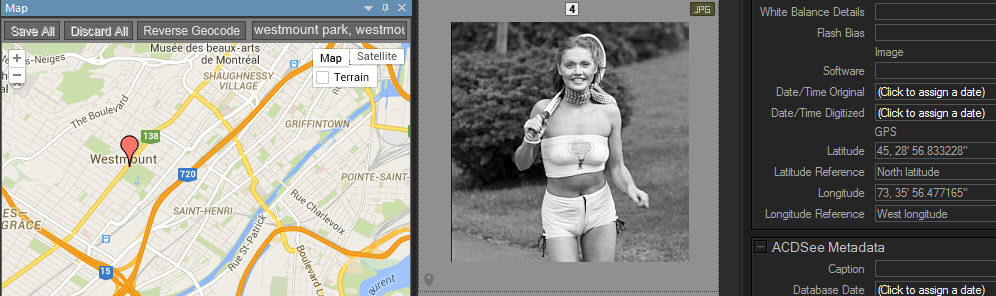 |
| 3 panels show the map with marker, the image, and the embedded GPS data |
 |
| GPS data revealed by Light Room + ExifMeta |
The strange "&" characters in the screen capture are due to an older version of the plug in, not the Pro's. Rob fixed this in later versions. Besides Location and Altitude, you can see it also stores GPS Date/Time, compass direction, and the number of satellites used to acquire the data. The higher the number, the more accurate the result.
The GPS times fields are really cool in that they provide the exact time the image was taken - right down to a fraction of a second - regardless of what the camera's clock is set to. That's worth a lot when you need accurate time stamping for record photography. It would be nice if image management software displayed all the header data without requiring special add-ins or plug-ins.
On-board Orientation Sensors
Another potent feature of the GeoTagger Pro series is that it also provides an LCD read out on the back side that provides even more data that is not passed to the camera such as roll (tilt) and pitch (elevation) using on-board field sensors like most recent Droid, Apple, and tablet devices now do.
Independent Geo-Tracking
In addition to the immediate stamping of GPS data into the image, the unit can also operate independent of the camera in its Data Logging mode, using its own rechargeable battery and memory, to record up to 60,000 GPS locations taken at intervals of from 1 second to 30 minutes. The logging data can be extracted from the unit with a companion utility that is formatted for geo tracking applications.
S E T U P
There is not much to the installation of the Pro series. There are two things to set up. The unit itself and the companion Utility software program.
GeoTagger Pro 1 setup: There is very little to do set up on the Pro. You plug it into the camera, set up a few options by using buttons on the side of the unit. For example, to set the local time adjustment, data logging mode and the time interval (only if you plan to use it).
You then calibrate the 3 axis sensors that measure the roll, pitch and yaw (direction) of the unit. Roll is the tilting to the left or right. Pitch is the angle upwards (toward the sky) or downwards (toward the ground). Yaw is the rotation left or right as in the turning of a compass needle. The instructions in the earlier releases for the calibration process were hard to understand unless you've done it before. Solmeta listened to the testers and improved later versions of the manual and set up instruction to make it clearer and posted a video on their site that visually demonstrates the process.
In a nutshell, this is how to calibrate the sensors: You first you mount the unit on the camera to account for anomalies from the camera's magnetic influences. You can skip this if you plan to use the Pro as an stand alone geo data logger without a camera. You then enable the calibration mode using the menu button on the side of the unit. You then rotate the unit a full 360 degrees two full times slowly around each axis taking roughly 5-7 seconds for each rotation as detailed below:
- Direction Sensor using the vertical axis (like a compass needle turning):
Keeping the unit level (sitting on a table will do), you turn it in either direction two complete turns. E.g., turn it to the right, then toward you, onward to the left, and back to the forward position. Then repeat the process a second time.
- Pitch Sensor using the horizontal axis:
Without tilting the unit to the left or right, you pitch the camera forward and down until it is pointing at the ground. Then onwards until it is upside down pointing at you. On to pointing straight up. And finally back to pointing forward. Then repeat the process a second time. - Roll Sensor using the forward axis:
While keeping the unit pointing forward, you tilt the unit in either direction, completing a full rotation. E.g., you tilt it to the right until it is sideways (as if shooting a vertical portrait). Then onward until it is upside down but still pointing forward. The on to being sideways the other way. And back to level. Then repeat the process a second time.
Utility Software Setup: This was problematic with early versions due to software bugs, poor instructions, and the use of a special USB driver that made the USB connection emulate a serial interface (like old analog modems). That is not Solmeta's fault. It is because GPS units used a serial communications standard called NMEA. But, as with the other early quirks, Solmeta revised the software and improved the instructions. The latest revisions fixed all the notable issues.
The actual software set up consists of installing the software and loading the special USB serial emulator. It's easier than it sounds but quirky nonetheless. Once installed and running, the software has a crude and simplistic interface that gets the job done without any beauty. The software is used to upgrade the firmware of the Pro as well as to download any geo tracking data you may have generated in data logging mode. Overall, this was the weakest part of the product but it works.
%2C%2BUtility%2BSoftware%2BScreen.jpg) |
| Software Utility Program for Firmware Updating and Data Downloading |
The Pro 2 literature says that it appears to a PC like a thumb drive to access the log data. That was one of the strongest requests during Pro 1 testing. Not having to use the arcane software utility to fetch your data is a great improvement. It will be interesting to see how the software updates the firmware and what the interface looks like. It can definitely use a facelift.
U S E & P E R F O R M A N C E
Once everything is set up, using the unit is very easy. You plug the unit into the camera hot shoe or attach it somewhere then connect the cable to the data jack on the camera. Turn on the unit and the camera. As soon as it is powered, the unit begins to acquire the position from as many satellites as it can find.
 The Pro 1 receiver was a standard GPS chip which, coupled with the small size of the Pro 1 and its necessarily small small antenna inside, initial position acquisitions after being off for hours, took from 20-60 seconds with some a few rare outliers at 90 seconds.
Once position is acquired, subsequent acquisitions made after brief periods of being off could be near instantaneous. In our our tests, acquisitions after being off for only minutes, took 1-20 seconds. The longer the time from the last acquisition, the longer it takes to reacquire - up to the full 60 or so seconds.
When location is acquired, you'll see it appear on the LCD and the Nikon top display panel will show a GPS icon. The info display on the back of the camera will show a lot more info. Take a picture and, voila. It is stamped with the location, date/time, altitude, and compass direction.
When entering a building with no access to the sky, the unit can be set to use the last location. For example, if shooting a party outside and venturing inside for more shots, all images will have GPS data embedded. One quirk of early units was that if you turned off the camera, it put the Pro 1 to sleep, and the last location was erased. I made several "last location' design suggestions (as others probably did) about this issue so they may have addressed the problem in later Pro 1 firmware revisions.
As I write this update, I am happy to have noticed they just released a new Pro 1 firmware revision in December 2014. That speaks well of their commitment to their users since the Pro 2 has been out for many months. It is not uncommon for OEMs of any size to stop firmware revisions as soon as newer hardware is produced. So that's a plus for Solmeta. Their web site also clearly states that the Pro 1 is superseded by the Pro 2 which is good to see in print without assuming or, worse, buying an old unit from a distributor.
Accuracy: The positional accuracy of the Pro 1 is based on the GPS receiver chip it uses. There is some confusing as to which chip the early Pro 1 used. The last edition of the Pro 1's manual (Version 2.0b) states it used the same GPS chip as the Pro 2 even though the Pro 2 is stated to have faster acquisition and more accuracy. Or testing of the older Pro 1 (hardware version v10.3) shows that the average location accuracy varied quite a bit between readings (as expected) but averaged about 30 feet. Solmeta says the Pro 2 has a new design and makes the most of its MTK MT3329 chip (same as the Pro 1) which can receive 60 different channels and actively use 20 of them. That translates to faster acquisition time and higher accuracy. We'll be sure to report on this in our review of the Pro 2.
C O N C L U S I O N
Early test versions of the Pro 1 had their share of problems but that is why they were called test versions. The 1st released versions were quite stable with only a few remaining blemishes like utility program malfunctions, cable breakage, and so forth. Solmeta worked hard to eradicate most, if not all, of those initial problems and, to their credit, were quick to redesign and replace any defective items.
,+D300+Mount+Image.jpg) |
| Pro 1, Hot-shoe mounted on D300 |
,+Strap+Mount+Image.jpg) |
| Pro 1 - Strap mounted. |
The only remaining problem we had with the Pro 1 is that it easily falls out of the hot shoe if brushed by your arm as you carry the camera.
.jpg) |
| Nikon, Flash, SB-28, Shoe Lock |
(1) mount unit to camera strap with Velcro
(2) wrap rubber band from back of shoe mount to front of camera
(3) wedge a thin piece of cardboard into hot shoe to tighten grip
Considering all the features the Pro 1 had and the new and advertised improvements of the Pro 2, we would not hesitate to recommend that you at least look into the Pro 2. We cannot vouch for it until we test it but it looks like it may be a winner - especially now that Solmeta has dropped the price of their entire product line by 30-50%. As of this writing, the Pro 2 listed at $199 US while the entry level N1 goes for only $60 US. If you do consider Solmeta model, you should look at the Pro 2 or the N3 (latest circuit without an LCD or data logging) since they have better specifications. The Pro 2 gives you an LCD display, storage for close to 5 million points, and access to its logged data via standard storage mode of USB (like a thumb drive).
We will be reviewing their latest generation as soon as they arrive.
Stay tuned for reviews of their latest generation and thanks for dropping by!
~ fin ~
~ fin ~
About TK Anthony Research
We specialize in the research, development and promotion of quality
corporate architecture, product design, program code, technical
innovation, graphic arts, education, or other important areas. We
strive to maximize quality and value as measured by the user's
satisfaction per unit time. E.g., a high quality product costing $200
that satisfies for 20 years ($10/year) is worth much more than twice as
much as a lesser product that costs $100 and lasts 5 years ($20/year).
We like the motto of Zenith, the once leading (and long gone) US radio & TV company:
"The quality goes in before the name goes on."
A GPS tracker basically contains GPS module to get the GPS flag and ascertain the directions. meilleur
ReplyDeleteYou can likewise discover sites that audit the absolute most prevalent as seen on TV products. It is these site's intentions to ensure you are shielded from the infomercial tricks that exist. As Seen on TV Shop
ReplyDelete